Often we find hosting static content of data for web or mobile applications very difficult. Even though there are many CDN providers who offer solution through cloud systems, it always involves multi step or not an easy step.
Why Firebase Hosting is apt for mobile/mobile-web developers to host static contents?
- Well, if you are a mobile developer (Be it Android, iOS or Mobile-Web) you would have used at-least one product in firebase by now. So it is easy to use a product which we are familiar with. Also it is easy to manage billing on different products with one vendor.
- Unlike other vendors firebase hosting is guaranteed to be hosted at CDN edge servers. So the content is delivered so fast no matter where your customers are located.
- Lastly, firebase hosting is super developer friendly that it takes just 5 mins to set it up end to end and make contents Go-Live!
Overall flow in Firebase hosting
It primarily involves 3 major steps –
- Login
- Initialize
- Deploy
Below is the detailed overall flow involved in firebase hosting.

Let’s look in detail on each steps involved in the life-cycle –
1) Initial setup –
Step 1 – Install Node.js – Use the installer files from node js website to finish the setup
Step 2 – Install NPM – Select npm package manager in the custom setup screen to install npm
Step 3 – Install firebase tools –
npm install-g firebase-tools
Step 4 – Verify installation – Use the commands node -v, npm -v and firebase -V to check installations
2) Login –
Create or sign in using a Google account to start using firebase CLI tools.
- firebase login – Use this command to select and login to the Google account. Login is pretty straight forward in this case
- firebase login –no-localhost – When the above command doesn’t work – Try this. After you Grant access to your Google account, an authorization code will be generated. Copy paste the code in firebase CLI. You will login successfully
- Are you behind firewall? – When both of the above doesn’t work it means you are probably behind the firewall. Please note firebase hosting DOES NOT WORK FROM BEHIND FIREWALL

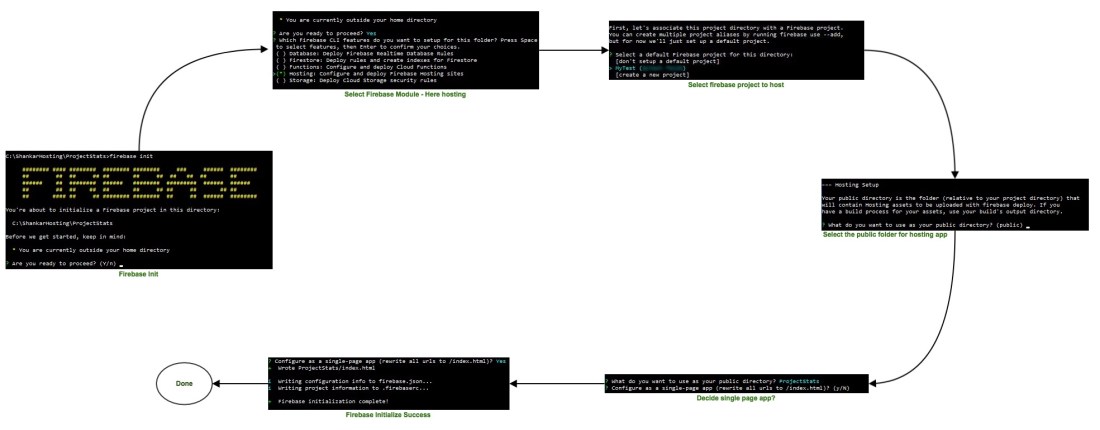
3) Initialize – First setup the local project in your machine to be hosted.
Way 1 – A simple folder where the static files reside
Way 2 – The files to be hosted may be an output of some CI/CD process
Either ways follow the simple steps below –
Step 1 – Initialize hosting
$ firebase init
Step 2 – Select Hosting from many of the different firebase modules that will be listed in CLI interface
Step 3 – Select Firebase project from the list of projects displayed. Remember you cannot create a new firebase project from CLI window
Step 4 – Select the public folder which has your index.html file. If there is none – Firebase would create one
Step 5 – Create a single page app by answering as ‘Yes’. This would take care of redirects to index.html if some invalid path is tried with the app hosted URL
Step 6 – On successful initialization – firebase.json and firebaseserc files will be generated
firebase.json –

firebaseserc – Contains information about project
4) Deploy –
$ firebase deploy
On successful deployment the window will display the number of files uploaded for deployment

5) Disable – Disable hosting using the command as described below in the image

6) Optional logout – Logout of the CLI by using the below command

Manage the hosted web content using the firebase web console

Try hosting your contents in a simple way as explained above.
Happy learning!
