For years, Tesla has been leading in innovating electric vehicles and energy solutions. However, their developer API remained tightly sealed, even though many other vendors offered these APIs by reverse engineering the Tesla unreleased APIs until Tesla decided to make their APIs publicly available in October 2023. This direct developer API from Tesla opens up a new frontier for developers and enthusiasts to integrate Tesla’s offerings into their apps and creations.
Let us see the step-by-step procedure to start consuming the Tesla developer APIs.
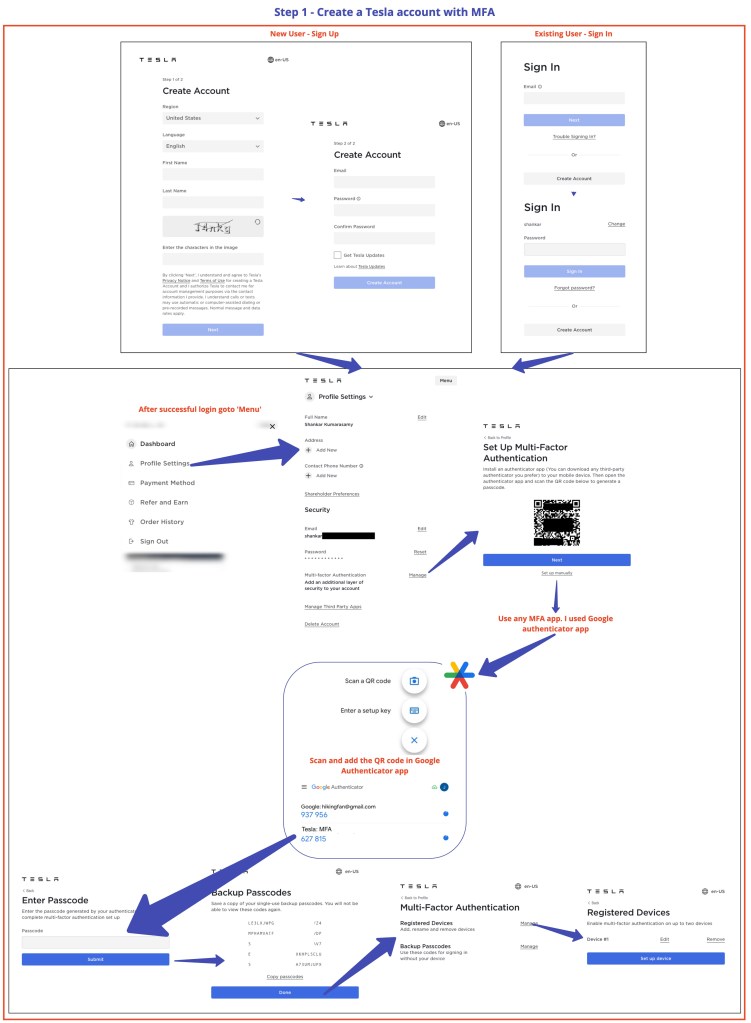
Step 1 – Create a Tesla account with MFA (Login Link)
Tesla enforces MFA to start requesting app access to be used by developers. There can be two scenarios here.
A. New user and setting the Tesla account for the first time using email and password.
B. Existing customers log in using a registered username and password.
It is important to note that in neither situation is multi-factor authentication (MFA) automatically enforced. The illustration below shows the step-by-step procedure for creating a successful Tesla account using MFA.
Step 2 – Submit the Access Request to get the App Credentials (Developer Portal Link)
The first thing in this step is to ‘Request app access’ by providing legal business details, app name, description, and purpose of usage.
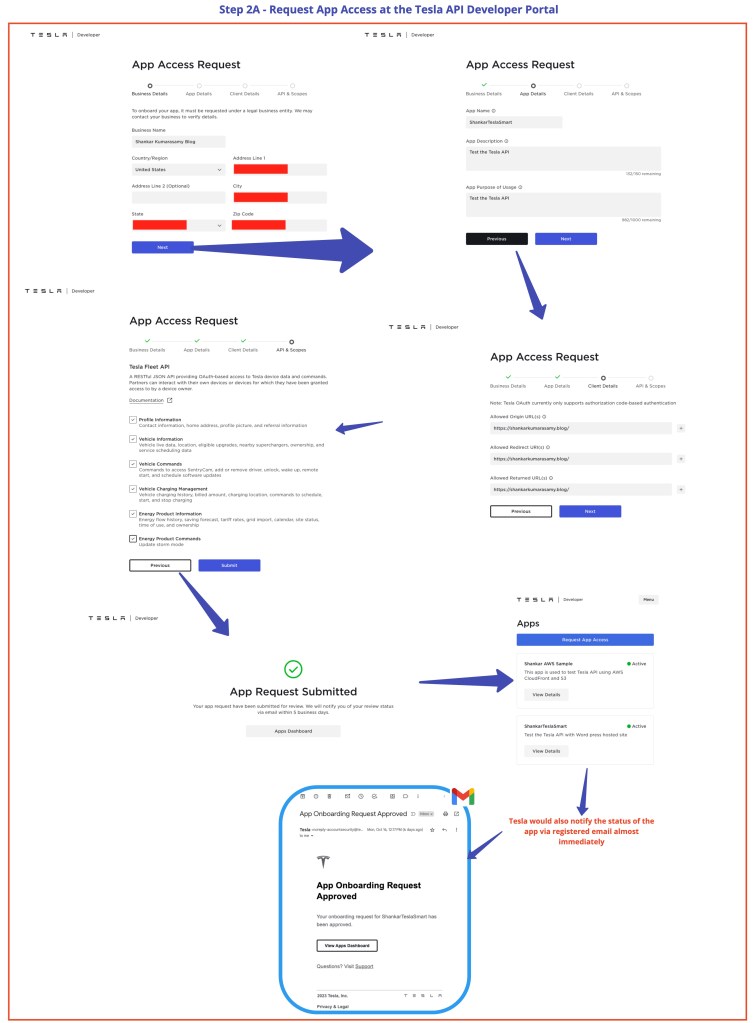
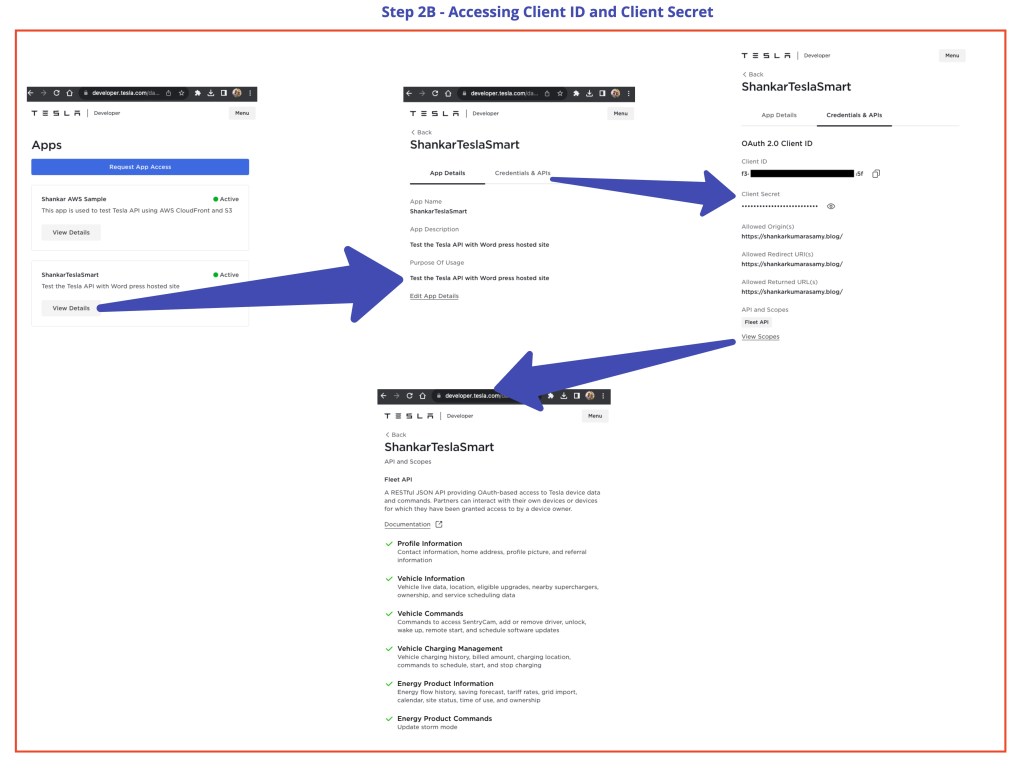
Once the app request is submitted, Tesla will review it and email it with status updates. Currently, this step is instantaneous. We can fetch the client ID and client secret from the developer portal.
Step 3 – Register for the App
Five steps involved to register the app.
A – Generate the public key
The below steps work for MacOS.
Install OpenSSL: In MacOS, Use brew install openssl if it’s not installed already.
Check the successful installation using openssl version.
Generate a private key: This command generates and saves it in the file 'private.pem'.
openssl ecparam -name prime256v1 -genkey -noout -out private.pemGenerate the public key: This command extracts the public key from the private key and saves it in the file 'public.pem'.
openssl ec -in private.pem -pubout -out public.pemLocate the public and private key: Navigate to ‘Users’ -> ‘Username’ in the MacOS.

Rename public key: Rename the 'public.pem' file to 'com.tesla.3p.public-key.pem'.
B – Host the public key in the /.well-known section of the website
This website is the same as the allowed origin website that we requested during app registration. The public key must be hosted on the location as mentioned below.
https://<your domain>/.well-known/appspecific/com.tesla.3p.public-key.pemI have tried hosting the public key file on two sites with different hosting environments.
- WordPress hosted site – I upgraded to the ‘WordPress Business’ plan to get SFTP credentials to access website files. Upload the public key to the desired location.
- CloudFront and S3 hosted site – Create the needed folder structure in S3 where the website files reside and upload the public key.
C – Generate the partner authentication token (Postman API Link)
Using the below Curl generate the partner authentication token.
CLIENT_ID=<command to obtain your client_id>
CLIENT_SECRET=<secure command to obtain your client_secret>
AUDIENCE="https://fleet-api.prd.na.vn.cloud.tesla.com"
# Partner authentication token request
curl --request POST \
  --header 'Content-Type: application/x-www-form-urlencoded' \
  --data-urlencode 'grant_type=client_credentials' \
  --data-urlencode "client_id=$CLIENT_ID" \
  --data-urlencode "client_secret=$CLIENT_SECRET" \
  --data-urlencode 'scope=openid vehicle_device_data vehicle_cmds vehicle_charging_cmds' \
  --data-urlencode "audience=$AUDIENCE" \
  'https://auth.tesla.com/oauth2/v3/token'
D – Register the app using a bearer token from (C) (Postman API Link)
Using the below Curl register the app.
curl --header 'Content-Type: application/json' \
  --header "Authorization: Bearer $PARTNER_AUTHENTICATION_TOKEN" \
  --data '{"domain":"string"}' \
  'https://fleet-api.prd.na.vn.cloud.tesla.com/api/1/partner_accounts'
E – Validate a successful registration of the app by calling the public key endpoint using bearer toke from (C) (Postman API Link)
Using the below Curl ensure the registration was successful.
curl --header 'Content-Type: application/json' \
  --header "Authorization: Bearer $PARTNER_AUTHENTICATION_TOKEN" \
  'https://fleet-api.prd.na.vn.cloud.tesla.com/api/1/partner_accounts/public_key'
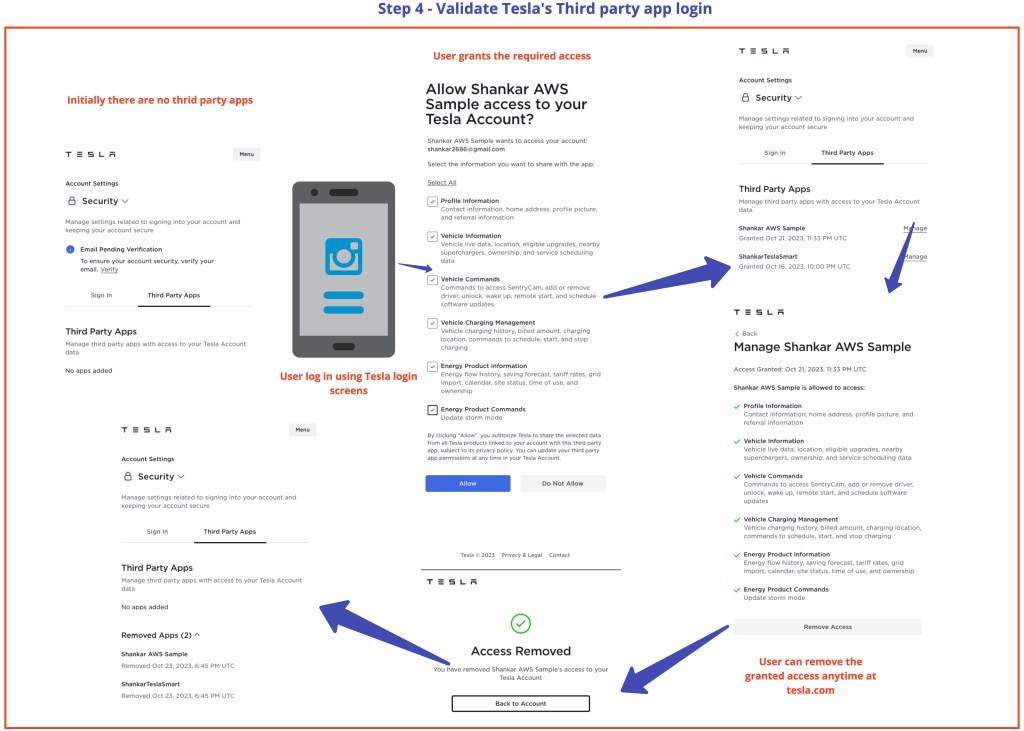
Step 4 – Validate the Third-party app login as the end customer
The app is now ready to be used to test with the user.
Using our registered app, we can redirect the user to get the authorization code (Postman API Link)
https://auth.tesla.com/oauth2/v3/authorize?client_id={{client_id}}&locale=en-US&prompt=login&redirect_uri={{redirect_uri}}&response_type=code&scope=openid user_data vehicle_device_data vehicle_cmds vehicle_charging_cmds energy_device_data energy_cmds offline_access&state=abc123Users can grant the needed access as part of the log in via third-party apps to provide restricted and granular access to the account.
Step 5 – Generate the access token that third-party apps can use
To access the Fleet API’s, you need access tokens with the necessary scopes. The following Curl command can be used to retrieve access, refresh, and id tokens: (Postman API Link).
curl --location 'https://auth.tesla.com/oauth2/v3/token' \
--data-urlencode 'grant_type=authorization_code' \
--data-urlencode 'client_id={{client_id}}' \
--data-urlencode 'client_secret={{client_secret}}' \
--data-urlencode 'code={{auth_code}}' \
--data-urlencode 'audience={{audience}}' \
--data-urlencode 'redirect_uri={{redirect_uri}}'
Third-party apps can persist the refresh token and get new access tokens based on the needs using the below Curl (Postman API Link).
curl --location 'https://auth.tesla.com/oauth2/v3/token' \
--header 'Content-Type: application/x-www-form-urlencoded' \
--data-urlencode 'grant_type=refresh_token' \
--data-urlencode 'client_id={{client_id}}' \
--data-urlencode 'refresh_token={{refresh_token}}'
Let’s take a detailed look at the various commands and operations available within the Tesla Fleet APIs, which we will explore in the next part of the blog.
Share your thoughts on use cases and modern architectures in implementing Tesla developer API in your applications.
Happy learning!

Do you have an idea why AkamaiGHost block me with 403?
The only place where it works is https://web.postman.co/
With local Postman, local curl or remote curl: I’m always blocked.
LikeLike
Do you have an idea why AkamaiGHost block me with 403?
The only place where it works is https://web.postman.co/
With local Postman, local curl or remote curl: I’m always blocked.
LikeLike
Great article … struggle my way through to retrieve my car’s charging state, to implement smart charging. Question: When/where you need the private key?
LikeLike
Thank you. And for any request that expects ‘Vehicle command’ as the scope, we need to have the private key accepted by the user.
LikeLike
I confirm. I managed to retrieve car data and even execute “vehicle commands’ for a couple of days. But suddenly it stopped working. I am getting “unsigned_cmds_hardlocked”. I suspect this is because I do no pass my private key.
In line with the Tesla instructions, I could accept my public key in the App. Now, can you give me a hint how to pass the corresponding public key in the request? (I prefer not to use the Tesla http proxy, if possible). Thanks!
LikeLike
Tesla is moving away from APIs and we will have to use the Tesla http proxy using their vehicle command SDK
LikeLike
Great article. If I’m running everything locally for testing purposes, including the redirect/call back url; how does the private/public key fit into the picture? As the key would be hosted on a non local host.
LikeLike
Thank you, Mohit. Currently, I’m testing the APIs on a real car. However, I’m looking for some test simulators for convenience.
Regarding the public and private keys –
1) The private key is always on the car as a key and can be seen in the Keys section under Locks on the car dashboard.
2) The public key, on the other hand, is used to encrypt the messages we send to the car using the Tesla proxy server
The user has to acknowledge installing the private key on the car dashboard. Once installed, they key can be removed only with the physical key card that comes with Tesla.
LikeLike
Thanks shankar, I wonder if you can help me validate some assumptions that I have:
The public key needs to be hosted on a publicly accessible domain, which is tied to the “allowed origin url” of the app registration process; so that tesla can grab it during the auth process.
As part of app registration process, tesla mentions “Only local hosts are supported for http:// protocol” Which I assume implies that the redirect URL can be set as localhost, but allowed origin can be on the public domain? The mis-match of domain shouldn’t impact the flow?
Where does the private key that’s generated on the local machine fit into the auth process? is that the same private key that’s sitting on the car? if so then in the auth process, where in the postman collections example do we add the private key?
LikeLike
Extra context: If I try call the partner register endpoint with domain localhost, which is the registered origin in tesla app, it gives me this error “Invalid domain: http://localhost. Ensure that domain is lowercase and starts without https://“,
LikeLike
I am not able to perform step 3 paragraph D.
Can you please show some example what should be in the domain?
Have you tried it and did it work to you?
LikeLike
Yes, the domain name is not the fully qualified URL.
For example if the URL is https://www.example.com/. Then use example.com as the domain name.
LikeLike
Hi,
I am having an issues get the partner token in step C. I have the tesla developer account and have the CLIENT_ID and CLIENT_SECRET, but getting this error mismatch on the two CLIENT values:
{“error”:”unauthorized_client”,”error_description”:”We don’t recognize this client_id and client_secret combination”,”error_uri”:”https://auth.tesla.com/error/reference/fe8abac4-3706-4f84-884b-ecc0eaf16b3c-1705106856726″}
Any help is appreciated.
LikeLike
Thank you so much for this blog! I was trying to follow Tesla’s API docs but was getting errors.
Just wondering, if I wanted to “pro.mytesla.app://oauthredirect” as uri redirect, how do I register that on Tesla’s app? It doesn’t accept it
LikeLike
Thank you for this post, very helpful for what is now a very big undertaking compared to the previous owner API. If my goal is to only grab data from the car and NOT issue any commands, do I still need to generate/host the private/public key?
LikeLike
Yes, thats true. One way to get the data from the car is using telemetry. Telemetry requires the public key to be hosted on your site.
LikeLike
Fantastic article Shankar! May I have some further query please? I got stuck at Step 4 and I don’t know what my `redirect_uri` is or how to configure my `redirect_uri`. Could you share more hint about that please?
Thanks.
LikeLike
Hi Shankar:
Thanks for the article. It is very helpful.
I am running into issue on ‘Application Access Request’ where I think my URL/URIs are incorrect.
I have created a website and redirect my domain [Shinjinnin.com] to it. I managed to submit with:
URL:
https://shinjinnin.com/
URI:
https://shinjinnin.com/path
Opt return URL:
https://shinjinnin.com/
But I don’t actually have /path.
When I go to next page and click on all the square boxes, I got an onboarding error during submit.
Any comments are greatly appreciated. Thanks in advance.
-Yuchia
LikeLike
Hi all
i am not realy sure if this is the right place…
I am looking for help with opening a geo link from Tesla Browser in Tesla Navigation.
like „geo://lat lon“ (e.g. which did not work 😋)
anybody an idea or link who helps me?
thx a lot
Marin
LikeLike